Senior STEM Capstone Project

I am currently one of only three students enrolled in a brand new class in my school, Senior STEM Capstone. In this class we bring a conceptual idea into a reality. My goal for this class is to create a glove that uses flex sensors on its fingers to read inputs from someone’s hand. The data will then be sent via wifi to a website, where it can be used in either computer programs or in other Arduino projects capable of reading from the website.

The complete documentation of our project so far, including pictures, code, and further descriptions : Notebook.pdf

TEC Internship Project

While I was at my internship at Yankee Scientific, I was given an Arduino, an LCD display, a control panel, and some sensors to tinker with in my spare time. I used the LCD display to show the values of a light and temperature sensor, and used the control panel to set limits for both values. As soon as either sensor value passed the limit threshold, a set of LEDs would light up.

image4
This was the final implementation of the project.
image3
Here is a close up of the LEDs going off.
image2
A slightly further-out close up of the Arduino and breadboard.

Outdoor Track

Here are some videos of my junior season. The first video shows me achieving my personal best of 23.84. The second video shows a part of my leg in the 4×200 relay at the Division 1 relays, in which the baton was dropped during the prior handoff. We lost a lot of ground, but I was able to catch up to the team in front of us. I’m in lane 6 both times. Time to train for next season!


Indoor Track

Screen Shot 2014-01-05 at 9.10.05 PM
This is a photo of me running around the final bend in a 300 meter race at the Bay State Championships as a sophomore. My current personal record in the event is a 38.37, which I hope to improve upon as a captain of the 2015-16 team.

Elevator Madness

This app was based on the simple concept of sliding an elevator up and down in order to save people from falling into the empty shaft.

Download link : (https://itunes.apple.com/us/app/elevator-madness/id921223362?mt=8)

Note: My apps are listed under Peter Mesnik because I am too young to sign the developer agreement.

IMG_1290
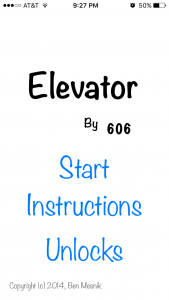
The main menu screen allows for you to either start the game, read instructions, or purchase unlocks.

IMG_1293
The two different game modes. In Normal mode, the elevator shaft moves closer to the hallway, then moves back and the people speed up, after that another person shows up and eventually they both speed up. In Arcade mode, two people show up immediately and both speed up gradually.
IMG_1292
The total score unlocks include extra lives and different animations.

IMG_1291
The high score unlocks include a rainbow colored elevator and Arcade mode.

IMG_1302
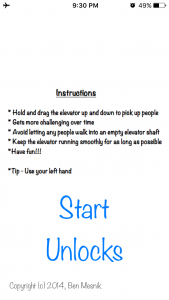
There are also some brief instructions.

IMG_1300
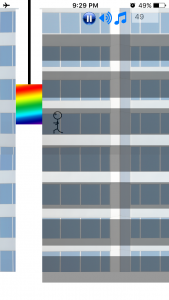
Here is a screenshot of the game itself.

IMG_1301
Once a person falls into the shaft, you lose and this screen pops up. You have the choice to either use an extra life and continue from where you just were, restart into another round, or exit to the main menu.

Dot Tapper

This was the second app that I created. I developed this one over the course of a weekend using the knowledge I gained from Elevator Madness to speed up the process.

Screenshot 2014.10.05 00.10.46
The game includes two modes. Pictured above is the timed mode, Speed Run, in which you must tap twenty randomly placed dots in the least amount of time.

Screenshot 2014.10.05 00.10.54
When you either get to twenty dots(a win) or hit the background(scored as a Did Not Finish), this screen pops up.

Screenshot 2014.10.05 00.10.18
In the other mode, Survival, you must tap the dots as fast as you can to make them disappear. Once more than five dots appear on the screen at the same time, the game ends.

Screenshot 2014.10.05 00.09.32
Once more than five dots are shown or you press the background, this screen is shown.

Arduino Car Version 2.0

I built this car with the goal of miniaturizing my first version and using a new form of remote control. I took a smaller remote control toy car and tore out the built-in control system, leaving only the motors and battery intact. This time, I purchased the smallest Arduino, motor controller, and bluetooth shield in attempt to keep the small size. I also used a second Arduino with a tilt sensor and bluetooth module attached, which would act as the controller for the car. The tilt sensor picks up the change in tilt of a person’s hand and steers the car accordingly.
P1120253
This is what the car looks like with the cover on.
P1120254
The Arduino here has a built-in bluetooth shield which allows for a smaller design. There is also a lithium-ion battery pack and a very small tilt sensor. The small size of the components mean it can be fit inside the black box shown in the background of the picture.
P1120256
When the cover of the car is removed, you can see the intricate packing of the Arduino, bluetooth module, motor shield, and battery pack.
P1120258
When the microprocessor is lifted up, you can see the tight bundle of wires that go into the car.

Arduino Bluetooth Controlled Car

This was one of my first Arduino projects. I disassembled a remote control toy car and replaced its guts with my own Arduino microprocessor and motor controller. I was able to reuse the servo, motors, and battery compartment from the existing car. The car was controlled via bluetooth from my Android phone.

P1120262
Outside view of the car with the cover in place.

P1120264
View of the car with the cover off. Four main components are stacked on top of each other. From the bottom up: Arduino microprocessor, motor control shield, bluetooth shield, bluetooth module.

P1120267
When the stack is lifted up, you can see all of the wiring connections.